NeetoDeploy: Zero to One

June 8, 2023
This blog chronicles the exciting journey of how we built NeetoDeploy. It's a Heroku alternative. We started from absolute zero and built a fully functional PaaS product with almost all the features that Heroku offers on their review apps, with a team of 4 developers in 2 months.
How it all started
At Neeto, we are building 20+ products simultaneously. All of these products had their production and staging environments hosted on Heroku. In addition, pull requests from these products had review apps deployed on Heroku. With an average of 5 open PRs at any time per product, we are talking about 100+ live review apps, 20+ staging apps, and 15+ production apps. Each one of these apps needed PostgreSQL, Redis, and ElasticSearch instances, besides other requirements.
In August 2022, Heroku made this announcement.
"Starting November 28, 2022, we plan to stop offering free product plans and plan to start shutting down free dynos and data services."
It meant that in 2 months, our monthly Heroku bill would skyrocket. At first, we talked about switching to one of the Heroku alternatives.
"Every problem is an opportunity in disguise." - John Adams.
And we thought - "Why not build our own Heroku replacement?".
BigBinary has over 11 years of Ruby on Rails and React consulting expertise. However, building a Heroku replacement, a complex The DevOps-heavy project was way out of our comfort zone. With faith in our engineering team and an exuberant spirit of youthful adventure, we embarked on a journey in early September 2022 to build NeetoDeploy.
The Journey
We put together a team of 4 developers. We discussed technologies ranging from Capistrano, Ansible, and AWS to Kubernetes. The more we talked, the more it became clear that no single technology could solve this problem. We needed a complex system with multiple independent components that would interact together to handle the following core responsibilities:
- GitHub integration.
- A build system that would identify the application's run-time dependencies, install them in the correct order, and build runnable machine images.
- A scalable containerized environment that can run the pre-built machine images.
- A place to store the built machine images.
- If the application needed a connection to external services (PostgreSQL, Redis, ElasticSearch, etc.), the ability to provision those on run-time.
- A dashboard to view and manage the deployments.
- Live logs.
- Load balancing/routing.
The Architecture
Once we understood the core functionality, we devised an architecture for the system. We then drew an architecture diagram depicting the different components and how they would interact with each other.
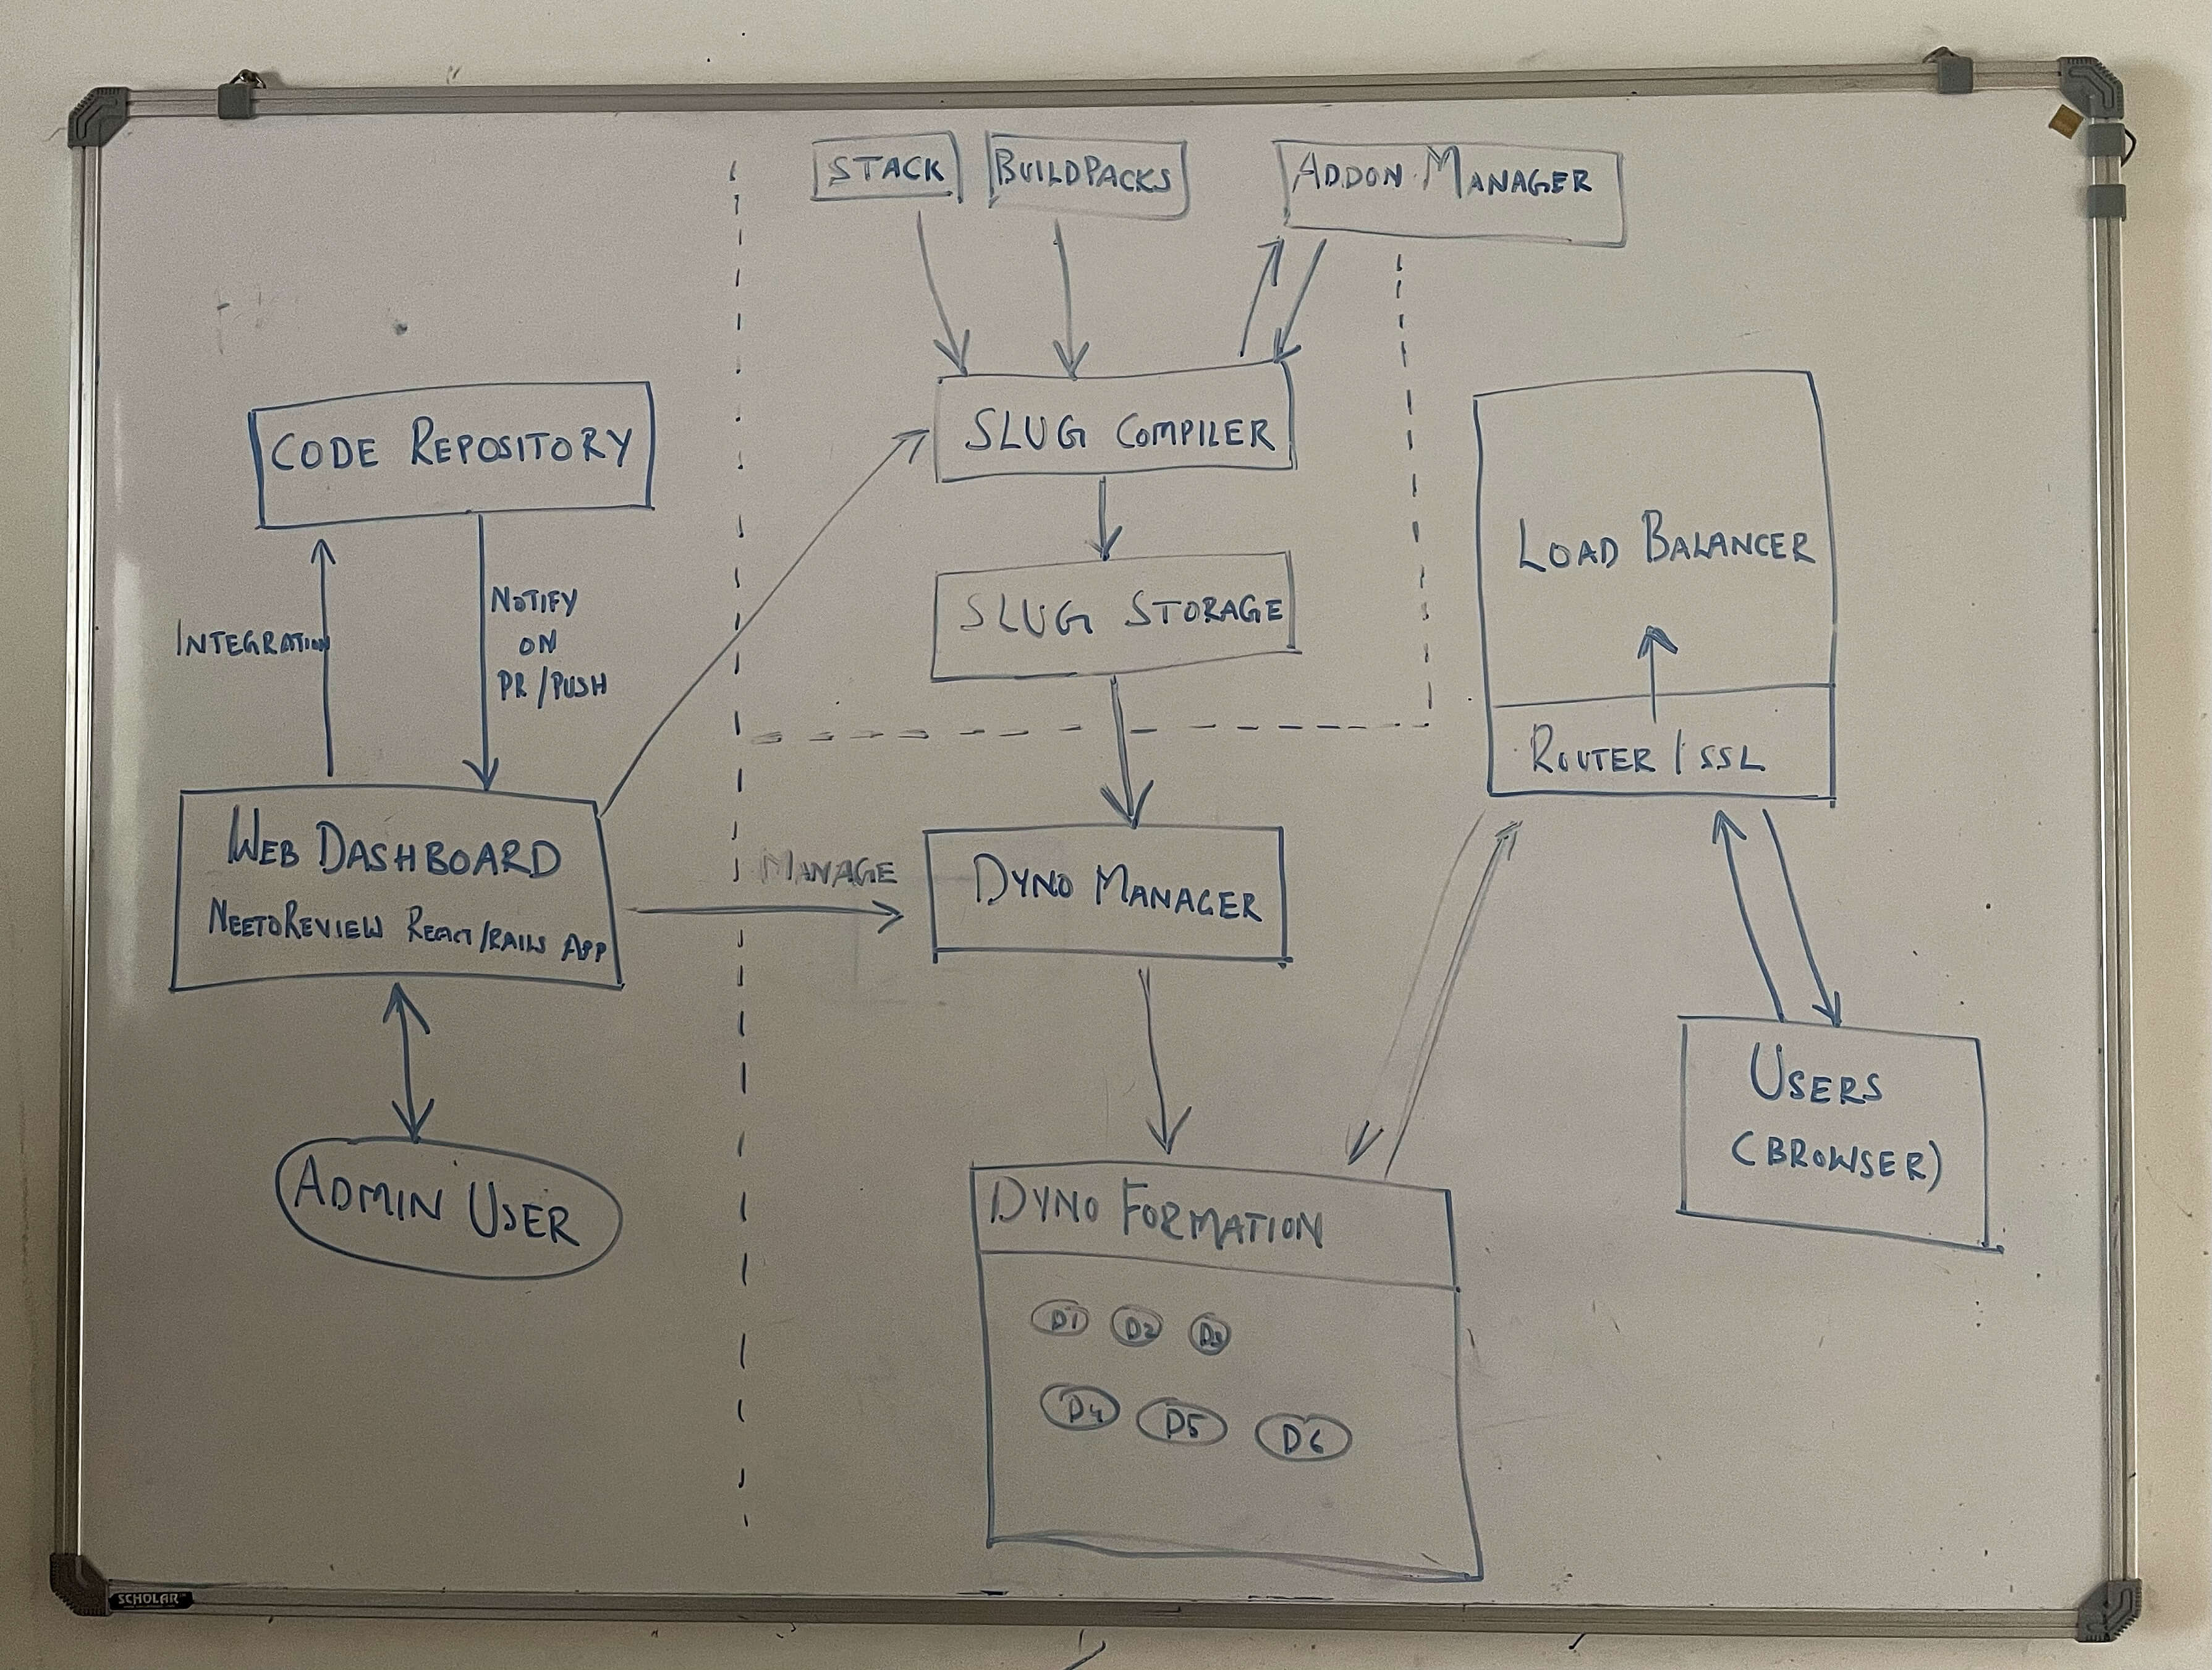
This diagram helped facilitate the rest of the discussions and our questions regarding the project's feasibility. We looked at the diagram and saw for the first time that we could break up this complex beast into manageable pieces that we could build, test and deploy independently.
As per the plan, NeetoDeploy would comprise the following independent components:
- Slug Compiler
- Dyno Manager
- Add-on Manager
- The Compute Cluster - with the router and load balancer
- Web Dashboard
The Slug Compiler
This component would bundle the application code, its run-time dependencies (Ruby, Node, Ruby gems, NPM packages, third-party tools like ffmpeg, etc.), and the operating system into a single image. We could then run this image on a container.
Using Docker to build the image was the first approach that we tried. After analyzing the problem, we understood that we needed to generate a Dockerfile on the fly. While working on this problem, we stumbled upon Cloud Native Buildpacks.
Their website said, "transform your application source code into images that can run on any cloud". This is precisely what we needed.
CNB(Cloud Native Buildpacks) system has three components:
- Stack
- Builder
- Buildpacks
CNB provides pack utility that would accept stack, builder, and buildpacks as parameters and build an OCI-compliant machine image that works with existing Docker tooling and any broader container ecosystem like Kubernetes. In addition, Heroku had open-sourced their older stacks and builders.
Now we had everything we needed to build runnable images. But we needed the ability to build multiple images in parallel since NeetoDeploy would have various projects, and each project could have numerous deployments (app corresponding to the main branch for staging/production and review apps for each commit in a pull request).
We built the initial version of Slug Compiler as a Ruby on Rails application, exposing API endpoints to start and stop a build. It would need a GitHub repository URL to fetch the source code, a list of buildpacks, and a callback URL as inputs. Once the image is successfully built, it will make a POST request to the callback URL.
The slug compiler would spin up an EC2 machine for each build request. We made a
custom AMI from an Ubuntu image with pack and other packages required for the
CNB build system to run. Once the pack command builds the image, it will push
it to our Dockerhub account (Docker registry) and return the image URL via a
callback. It would then kill the EC2 instance.
We found uploading the image to Dockerhub very slow. So we set up a private Docker registry on AWS ECS.
The Add-on Manager
Applications typically need access to a database, search service, cache service, etc. The Neeto products use PostgreSQL, Redis, and ElasticSearch. We decided to build the first version of the add-on manager to support these add-ons.
We built the add-on infrastructure using three big AWS EC2 boxes to keep things simple. Each machine ran a PG, Redis, and ElasticSearch server, respectively. We made the add-on manager as a Ruby on Rails API server, which would accept the add-on type as input and return a connection URI with login credentials included. We would support only a fixed version of the add-ons in the initial version.
Upon receiving the request for a PG add-on, we will create a new database on the PG server with a unique username/password and return the connection string. For Redis and ElasticSearch, we simulated separate connections using namespaces.
This add-on manager had some severe drawbacks since multiple applications shared the same add-on servers running on the same physical machine. Two of the biggest drawbacks had to do with Security and Resource choking.
- Security: With some effort, it was possible to tamper with the data of other applications.
- Resource choking: If one application uses more CPU and Memory, it blocks all other applications.
Nevertheless, this throw-away version of the add-on manager was a good start.
The Dyno manager and the compute cluster
We needed a secure, scalable, containerized environment to run our pre-built images. Kubernetes was the obvious answer. Kubernetes, also known as K8s, is an open-source system for automating deployment, scaling, and managing containerized applications. We created our cluster on AWS EKS.
Dyno manager was once again a Ruby on Rails API server app, which takes a pre-built OCI image URL and a callback URL as inputs. It would then interface with the Kubernetes cluster using the kubectl CLI to deploy the image on the cluster.
Our first cluster was of fixed size. It had four nodes (EC2 machines). Kubernetes would deploy images to these machines and manage them. But the fixed-size cluster soon proved inadequate as we had more parallel deployments than could be accommodated. So we set up cluster autoscaling.
Load balancing and routing
All applications hosted on NeetoDeploy are made publicly available on a _.neetoreviewapp.com subdomain. A public IP address is needed to set up a DNS CNAME record for _.neetoreviewapp.com. We provisioned an Elastic Load Balancer, an AWS component with a public IP address. ELB is the component of our system that acts as the interface to the outside world.
We now needed to route the incoming web requests based on the subdomain to one of the deployed applications, which required a programmable router. An Nginx ingress controller would meet this requirement. The Nginx ingress controller is essentially an Nginx server set up as a reverse proxy with the redirect rules necessary.
The Web Dashboard
NeetoDeploy needed an admin user-facing web application that would perform the following functions:
- Admin user login.
- Initiate Github account integration.
- Select a repo and create a project.
- View and manage the deployments for a project.
- Interact with other components (Slug compiler, dyno manager, and add-on manager) to coordinate and orchestrate the functioning of the NeetoDeploy system.
- Maintain state like store project-specific environment variables, add-on connection URLs, pre-built image URLs, etc.
We built the Dashboard app using Ruby on Rails, React.js, neetoUI, and other integrations typical of any Neeto product.
Live logging
We needed to fetch and display two types of logs at run-time:
- Build and release logs.
- Application logs.
Fetching live logs from a remote machine and displaying them in the browser is a complicated problem. We went with Server Side Events (SSE) for the first version and streamed the logs directly to the browser.
- The dyno manager would tail
kubectl logs. - STDOUT was continuously read and transmitted as server-side events.
- The dyno manager sent the
app-logs-urlto the dashboard app via a callback. - Dashboard app had a log-display React component that streamed the SSE events
using the
app-logs-urland displayed the live logs.
How it all came together
- The Admin user signed up for a new account.
- The admin logged in to the Dashboard app.
- The GitHub account was connected by the admin.
- The admin created a new project after selecting a GitHub repository.
- The admin made a new Pull Request in the selected GitHub repository.
- The dashboard app received the GitHub event for the new pull request creation.
- The dashboard app requested the slug compiler to build an image for the repository using code corresponding to the pull request's latest commit. It also sent the list of buildpacks to use.
- The dashboard app also requested the add-on manager to create the necessary add-ons.
- The dashboard app received the add-on URLs and saved them.
- Slug compiler built the image, stored it on ECS and made a callback to the dashboard app with the image URL, and the dashboard app saved the image URL.
- The dashboard app requested the dyno manager to deploy and start the necessary web and worker processes after passing the image URL and add-on URLs as environment variables to set on the containers.
- The Dyno manager talked to Kubernetes, completed the specified cluster deployments and set up the necessary ingress rules.
- The application is available for public access at https://xyz.neetoreviewapp.com.
Roadmap
We improved each component to make them scalable, secure and robust. We added features like CLI, performance metrics, continuous database backup, enabled caching, reduced build time, horizontal scaling to support the increased load, platform extensibility with custom build packs, stabilized live logging with Fluentbit and more.
We migrated the review apps and staging environment of all neeto products to NeetoDeploy. We also migrated production instances of most of our static websites. We are now gearing up to migrate the production instances of all the Neeto products. Exciting features like custom plans for dynos, support for more add-on types, autoscaling to support unexpected surges in traffic and more, are in the pipeline.
In the coming weeks and months, we will be writing more about the challenges we faced and how we are building NeetoDeploy. Stay tuned for more.
If your application runs on Heroku, you can deploy it on NeetoDeploy without any change. If you want to give NeetoDeploy a try, then please send us an email at [email protected].
If you have questions about NeetoDeploy or want to see the journey, follow NeetoDeploy on Twitter. You can also join our community Slack to chat with us about any Neeto product.
Follow @bigbinary on X. Check out our full blog archive.