React localization with i18next and react-i18next libraries

July 27, 2023
Localization is the process of designing and developing your products that can adapt to various languages and regions, without requiring a complete overhaul. This can involve tasks such as translating the text into different languages, adjusting the format of dates and times, changing the currencies and many more.
Why is localization important?
Localization is important for overcoming language barriers and making your products accessible to people from different cultures and regions.
For example, let's say you are developing a product for a company that has customers in multiple countries, and the product is currently only available in English. This means that potential customers who speak other languages may be less likely to use the product or may have difficulty navigating it. By implementing localization in the product, you can easily add support for other languages without requiring extensive code changes. This will make the product more accessible to a wider range of audiences and increase the likelihood of the product being used by people in different regions.
Localization is more than just translating text. It also involves adapting various aspects of the products, including date and time formats, currencies, and other cultural conventions to create a more native experience for the target audience. Providing a localized experience can help the product better meet the needs and expectations of users in different regions, leading to better user engagement and satisfaction.
How to implement localization in React?
To implement localization effectively, it's important to choose a suitable
localization package that works well with the chosen framework. In
Neeto products, the
i18next and
react-i18next libraries are used
for localization because they are well-maintained, have good documentation and
are easy to use. i18next provides a flexible and powerful translation engine,
while react-i18next provides hooks and components for managing translations in
React components. Before getting into the details of how to implement
localization using these libraries, let's first understand some of the terms
that would be used.
Translation file
A translation file is a file that contains a set of translated strings for a particular language. Each supported language will have its own dedicated translation file.
For example, a translation file for English would contain English translations for all the strings in the application.
{
  "browseProducts": "Browse Products",
  "addToCart": "Add to Cart"
}
A translation file for Spanish would contain Spanish translations for all the strings in the application.
{
  "browseProducts": "Explorar productos",
  "addToCart": "Agregar al carrito"
}
Translation key
A translation key is a unique identifier used to look up a translated string in
a translation file. A translation key can be any string that you want and it is
typically a short, descriptive string that represents the text to be translated.
In the above example, browseProducts and addToCart are the translation keys.
In some cases, translation keys are grouped together based on the context in which they are used or the component that they are used in. For instance, translation keys for buttons may be grouped together. In this case, a prefix is employed to group the translation keys together. To access a specific translation string within a group, you can use the prefix followed by a dot and then the translation key. Let's see an example of this.
{
  "button": {
    "submit": "Submit",
    "cancel": "Cancel"
  }
}
In this example, all the translation keys for buttons are grouped together under
the prefix button. To access the translation string for the button Submit,
the translation key button.submit is used. Similarly, for the button Cancel,
the translation key button.cancel is used. The nesting of translation keys is
not restricted to a single level, it can be extended to multiple levels as
necessary. However, it's best to keep the nesting to a minimum to avoid making
the keys overly complex and difficult to manage.
Now let's see how to use translation files and translation keys to implement localization in React.
As mentioned earlier, in neeto, the i18next and
react-i18next libraries are used for localization. Both these libraries
provide a translation function named t that takes a translation key as an
argument and returns the corresponding translated string from the translation
file.
The t function provided by i18next is a generic translation function that
can be used in any part of your JavaScript application. On the other hand, the
t function offered by react-i18next is intended exclusively for usage within
the React components and hooks. It can be accessed via the useTranslation
hook.
react-i18next is essentially a wrapper over the i18next engine. It offers
these additional facilities:
-
Language switching: The
useTranslationhook provided byreact-i18nextsimplifies the process of language switching by providing access to thei18ninstance. This powerful hook not only streamlines the switch but also ensures that translations are promptly updated by triggering an automatic re-render of the component whenever the language is changed.const { i18n } = useTranslation(); i18n.changeLanguage("en-US"); -
Namespace for loading translations on demand: As your project expands, it becomes essential to implement both code splitting and on-demand translation loading. Loading all translations upfront can result in suboptimal load times for your website. By using the namespace feature provided by the
useTranslationhook, you can efficiently organize your translations into separate files based on logical divisions or components. This enables you to dynamically load translations when they are required, instead of loading all translations simultaneously. This approach significantly improves load times, ensuring a smoother user experience.// the t function will be set to that namespace as default const { t } = useTranslation("ns1"); t("key"); // will be looked up from namespace ns1 -
Trans component for complex React elements: Apart from the
useTranslationhook,react-i18nextoffers a powerful component calledTrans. This component can be used for translating strings that contain HTML or React nodes. We will see more about this component later in this blog.
Now, let's take an example to see how these libraries can be used to implement localization in React. Consider a simple online store application that displays a welcome message to the customer and our goal is to show this message in both English and Spanish based on the customer's language preference.
For this, first you need to create a translation file for each language that you want to support. In this case, you need to create two translation files: one for English and one for Spanish.
// en.json
{
  "welcomeToOnlineStore": "Welcome to our online store!"
}
// es.json
{
  "welcomeToOnlineStore": "¡Bienvenidos a nuestra tienda en línea!"
}
Next, you need to initialize i18next and react-i18next in your application.
import i18n from "i18next";
import { initReactI18next } from "react-i18next";

import en from "../translations/en.json";
import es from "../translations/es.json";

i18n.use(initReactI18next).init({
  resources: { en: { translation: en }, es: { translation: es } },
  fallbackLng: "en",
});

export default i18n;
In this step, the i18next and react-i18next libraries are imported and
initialized with the translation files created in the first step. Additionally,
the fallback language is set to English. This means that if a translation is not
available for the current language, the translation for English will be used
instead.
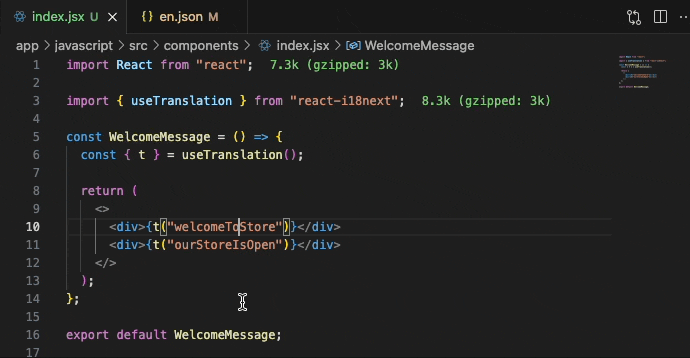
Now you can use the t function to translate strings as shown below.
import { useTranslation } from "react-i18next";

const WelcomeMessage = () => {
  const { t } = useTranslation();

  return <div>{t("welcomeToOnlineStore")}</div>;
};

export default WelcomeMessage;
Here, if the current language is English, the translated string for the
welcomeToOnlineStore key will be Welcome to our online store!. If the
current language is Spanish, the translated string will be
¡Bienvenidos a nuestra tienda en línea!. If the current language is any other
language, the translated string will be Welcome to our online store! since
translation resources have not been provided for other languages and the
fallback language is set to English.
At this point, you might be wondering how to set the current language in your
application. This is accomplished by using the i18next language detector. The
i18next language detector is a library that detects the current language of the
user's browser and sets it as the current language in your application. To use
the i18next language detector, you need to install the
i18next-browser-languagedetector
package and initialize it in your application. To initialize it you can modify
the code snippet that you saw earlier for initializing i18next and
react-i18next as shown below.
import i18n from "i18next";
import LanguageDetector from "i18next-browser-languagedetector";
import { initReactI18next } from "react-i18next";

import en from "../translations/en.json";
import es from "../translations/es.json";

i18n
  .use(LanguageDetector)
  .use(initReactI18next)
  .init({
    resources: { en: { translation: en }, es: { translation: es } },
    fallbackLng: "en",
  });

export default i18n;
Now that you have gained a fundamental understanding of how to use i18next and
react-i18next to implement localization in your React applications. Let's now
explore the best practices followed at neeto for
localization.
Best Practices followed at Neeto for localization
At neeto, a set of best practices has been developed for
localization, which has proven effective in improving code quality and
maintainability. To ensure that these best practices are consistently followed,
a corresponding set of ESLint rules has been created. These ESLint rules are
available in the
eslint-plugin-neeto
package. eslint-plugin-neeto is an ESLint plugin that contains a set of ESLint
rules that enforce the best practices followed at neeto. Let us now see the
rules that are available in eslint-plugin-neeto for localization, along with
the motivations behind their creation.
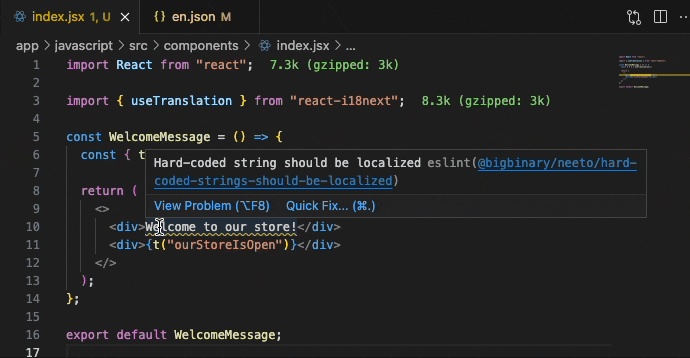
hard-coded-strings-should-be-localized
If a developer misses hard-coded strings that should be localized, it can result
in a mix of localized and non-localized strings within the application. This can
create inconsistent user experience, where some strings are correctly translated
and others are not. To avoid this scenario, we have created the
hard-coded-strings-should-be-localized eslint rule. This rule helps to ensure
that all hard-coded strings that should be localized are indeed localized.
no-missing-localization
This rule detects localization keys that do not have an associated value in the
translation file. In other words, if a translation key passed to the t
function is not present in any of the translation files, this rule will flag it
as an error. This ensures that all localized strings are properly translated,
thereby avoiding any inconsistencies that can negatively impact the user
experience. Moreover, it reduces the risk of errors and bugs caused by missing
translations.
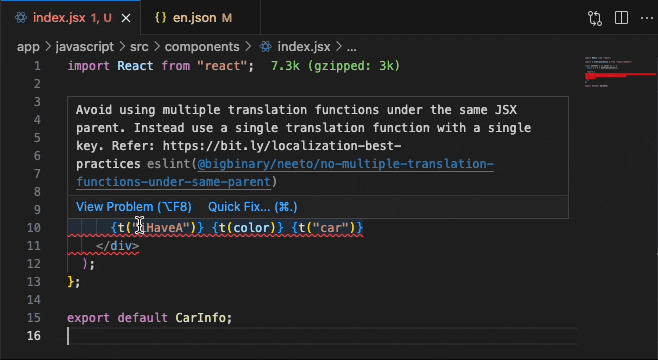
no-multiple-translation-functions-under-same-parent
This rule prevents the usage of multiple translation functions under the same JSX parent. The goal is to prevent breaking up sentences into multiple parts using multiple translation keys, which can be problematic when translating from one language to another because the order of words may change. For instance, adjectives in English typically come before the noun they modify, whereas in Spanish, they usually come after the noun.
Let's consider an example to understand this better. Suppose the sentence
I have a {color} car need to be translated in the below example, where color
is a variable that can have different values.
const CarInfo = ({ color }) => <div>I have a {color} car</div>;
The first thought that comes to mind is to use three translation keys, one for
I have a, one for car, and one for the value of the color variable. This
would result in the following code:
import { useTranslation } from "react-i18next";

const CarInfo = ({ color }) => {
  const { t } = useTranslation();

  return (
    <div>
      {t("iHaveA")} {t(color)} {t("car")}
    </div>
  );
};
Here, the translation file for English will be:
{
  "iHaveA": "I have a",
  "car": "car",
  "red": "red"
}
And the translation file for Spanish will be:
{
  "iHaveA": "Tengo un",
  "car": "coche",
  "red": "rojo"
}
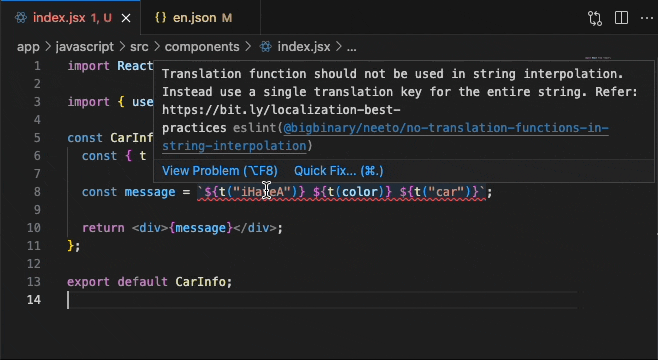
If the variable color has the value red, the translated sentence in Spanish
will be Tengo un rojo coche. However, this translation is incorrect since the
adjective rojo (red) precedes the noun coche (car), which goes against the
usual word order in Spanish. As previously mentioned, adjectives in Spanish
typically come after the noun they modify. Hence, the correct translation of the
sentence in Spanish would be Tengo un coche rojo. Now let's see how to solve
this issue.
To address this problem, you can use the interpolation feature in i18next.
The interpolation is a feature that allows us to insert dynamic values into the
translated string. In this case, the interpolation feature can be used to insert
the value of the color variable into the translated string. The interpolation
feature is implemented using the {{}} syntax. The variable name is placed
inside the {{}} syntax, and the value of the variable is passed as an object
to the t function. Let's modify the above example to use the interpolation
feature.
import { useTranslation } from "react-i18next";

const CarInfo = ({ color }) => {
  const { t } = useTranslation();

  return <div>{t("iHaveACar", { color: t(color) })}</div>;
};
Here, the translation file for English will be:
{
  "iHaveACar": "I have a {{color}} car",
  "red": "red"
}
And the translation file for Spanish will be:
{
  "iHaveACar": "Tengo un coche {{color}}",
  "red": "rojo"
}
In this case, the Spanish translation would be Tengo un coche rojo, which is
correct. As you can see here, with the interpolation feature, you have the
flexibility to adjust the word order in the translated sentence by modifying the
placement of the variable based on the language. This is not possible when
breaking up the sentence into multiple parts.
In short, you should avoid breaking up sentences into multiple parts using
multiple translation keys. i18next offers various methods to accomplish this,
and interpolation is one of them. Another scenario where you should avoid
breaking up sentences into multiple parts is when the sentence contains HTML or
React elements. In such cases, you can use the Trans component, which will be
explained in detail later in this blog post.
no-translation-functions-in-string-interpolation
This rule ensures that translation functions are not used inside the string interpolation. The goal of this rule is also same as the previous rule, which is to prevent breaking up sentences into multiple parts. However, this rule applies to string interpolation instead of JSX.
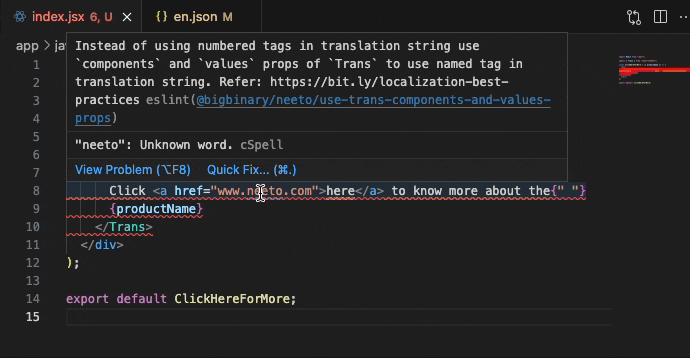
use-trans-components-and-values-prop
Before delving into the details of this rule, let's familiarize ourselves with
the Trans component offered by react-i18next. The Trans component is
helpful when translating text containing React or HTML nodes. However, it's
important to note that it may not be necessary in many cases. If your
translation doesn't involve React or HTML nodes, you can simply use the standard
t function. The t function is sufficient for most cases and is easier to use
than the Trans component.
Now let's see an example where you need to use Trans component. Suppose you
want to translate the following sentence:
const ClickHereForMore = () => (
  <div>
    Click <a href="www.neeto.com">here</a> for more information.
  </div>
);
If you use the standard t function, you would need to use three translations
keys as shown below:
import { useTranslation } from "react-i18next";

const ClickHereForMore = () => {
  const { t } = useTranslation();

  return (
    <div>
      {t("click")} <a href="www.neeto.com">{t("here")}</a>{" "}
      {t("forMoreInfomation")}
    </div>
  );
};
But you know that splitting sentences into multiple parts using multiple
translation keys can be problematic when translating from one language to
another. So, how can the above sentence be translated without splitting it into
multiple parts? This is where the Trans component comes in handy.
Here's how to use Trans component to translate the same sentence:
import { Trans } from "react-i18next";

const ClickHereForMore = () => (
  <Trans
    components={{ a: <a href="www.neeto.com" /> }}
    i18nKey="clickHereMessage"
  />
);
The translation file for English would look like this:
{
  "clickHereMessage": "Click <a>here</a> for more information."
}
As shown in the example above, the Trans component enables us to translate
entire sentences that include HTML or React nodes without breaking them into
multiple parts.
There are two ways to use Trans component.
Approach 1
import { Trans } from "react-i18next";

const ClickHereForMore = ({ productName }) => (
  <div>
    <Trans i18nKey="clickHereMessage">
      Click <a href="www.neeto.com">here</a> to know more about the{" "}
      {productName}
    </Trans>
  </div>
);
The translation file for English would look like this:
{
  "clickHereMessage": "Click <1>here</1> to know more about the <3>"
}
This approach, known as the indexed nodes approach, uses indexes to map the
nodes and variables. Here you need to pass the string to be translated as a
child of the Trans component. The Trans component will then map the nodes
and variables to indexes. In the above code, Click is mapped to index 0, the
anchor tag is mapped to index 1, the string to know more about the is
mapped to index 2, and the productName variable is mapped to index 3. So
if you want to wrap the here text with anchor tag in the translation file,
you would need to use <1> and </1> tags. Similarly for the productName
variable, you would need to use <3> tag. However, this approach is not
recommended because it requires looking at both the code and the translation
file to understand the mapping, making it difficult to read and maintain.
Approach 2
import { Trans } from "react-i18next";

const ClickHereForMore = ({ productName }) => (
  <div>
    <Trans
      components={{ a: <a href="www.neeto.com" /> }}
      i18nKey="clickHereMessage"
      values={{ productName }}
    />
  </div>
);
The translation file for English would look like this:
{
  "clickHereMessage": "Click <a>here</a> to know more about the {{productName}}"
}
This approach, known as the named nodes approach, uses the components prop and
values prop to map the nodes and variables. In the above code, the anchor
tag is mapped using the components prop, and the productName variable is
mapped using the values prop. As you can see here, the named nodes approach is
more readable and less prone to errors than the indexed nodes approach because
it eliminates the need for guessing indexes.
So the purpose of the use-trans-components-and-values-prop rule is to enforce
the usage of the named nodes instead of the indexed nodes in the Trans
component.
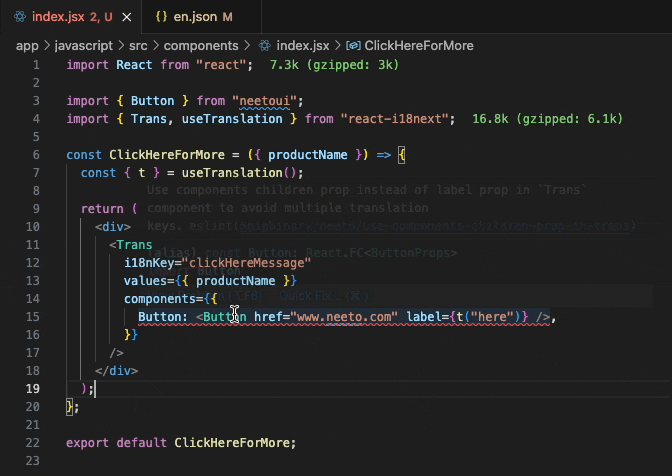
use-components-children-prop-in-trans
Now that the rationale behind using the Trans component and its usage has been
explained, let's delve into another challenge encountered when using Trans
with neetoUI components. neetoUI is an npm
package that drives the user experience across all the Neeto products. To
illustrate the problem, let's consider the following example:
import { Button } from "@bigbinary/neetoui";

const ClickHereForMore = () => (
  <div>
    Click <Button href="www.neeto.com" label="here" /> for more information.
  </div>
);
Here, the Button component accepts the content string via label prop. But,
Trans component doesn't support injecting translation keys via some custom
prop like this. To localize this, you would have no other way but to break the
sentence like this:
import { Button } from "@bigbinary/neetoui";
import { Trans } from "react-i18next";

const ClickHereForMore = () => (
  <Trans
    i18nKey="clickHereMessage"
    components={{
      Button: <Button href="www.neeto.com" label={t("here")} />,
    }}
  />
);
The translation file for English would look like this:
{
  "here": "here",
  "clickHereMessage": "Click <Button /> for more information."
}
As you can see here, you are forced to use one key for the whole message and
another one for the Button label. This is not a good practice, as it involves
using multiple translation keys for a single sentence.
To tackle this problem, support for the children prop has been incorporated
into neetoUI components in order to render the label. With this enhancement,
the code can be rewritten as follows:
import { Button } from "@bigbinary/neetoui";
import { Trans } from "react-i18next";

const ClickHereForMore = () => (
  <Trans
    components={{ Button: <Button href="www.neeto.com" /> }}
    i18nKey="clickHereMessage"
  />
);
The translation file for English would look like this:
{
  "clickHereMessage": "Click <Button>here</Button> for more information."
}
Now, as you can see, here only one key is used for the entire message which
makes it easier to manage. Therefore, this rule ensures that the children prop
of neetoUI components is used instead of the label prop when used with the
Trans component
use-translation-hook-in-components
There are two options for translating content in React components: using the
translation function from i18next and using the translation function from the
useTranslation hook provided by the react-i18next package. While both
options work, it is recommend using the translation function from the
useTranslation hook due to the advantages it offers, which were discussed
earlier.
So this rule is to enforces the use of the translation function from the
useTranslation hook in React components.

use-i18next-plurals
This rule enforces the use of i18next's built-in plurals for pluralization. Before delving into i18next's built-in plurals, let's take a look at other commonly used approaches for pluralization.
Approach 1
In this approach, a single key is utilized for both the singular and plural forms.
import { useTranslation } from "react-i18next";

const MembersInfo = ({ count }) => {
  const { t } = useTranslation();

  return <div>{t("membersWithCount", { count })}</div>;
};
The translation file for English would look like this:
{
  "membersWithCount": "{{count}} member(s)"
}
Approach 2
This approach uses two separate keys, one for the singular form and one for the plural form, and conditionally renders the appropriate key based on the count variable.
import { useTranslation } from "react-i18next";

const MembersCount = ({ count }) => {
  const { t } = useTranslation();

  return (
    <div>
      {count === 1
        ? t("memberWithCount", { count })
        : t("membersWithCount", { count })}
    </div>
  );
};
The translation file for English would look like this:
{
  "memberWithCount": "{{count}} member",
  "membersWithCount": "{{count}} members"
}
However, these approaches are not recommended because they are lazy or hacky way of approaching the problem. The recommended approach is to use i18next's built-in pluralization features, which allow for greater flexibility and consistency in translation.
Let's see how to use i18next's built-in pluralization feature. In this approach,
two keys are used: one for the singular form and one for the plural form. The
key for the singular form is suffixed with _one, and the key for the plural
form is suffixed with _other. This is how i18next's built-in pluralization
works. But in this case you don't need to worry about selecting the appropriate
key based on the count variable. i18next will automatically select the
appropriate key based on the count variable.
import { useTranslation } from "react-i18next";

const MembersInfo = ({ count }) => {
  const { t } = useTranslation();

  return <div>{t("memberWithCount", { count })}</div>;
};
The translation file for English would look like this:
{
  "memberWithCount_one": "{{count}} member",
  "memberWithCount_other": "{{count}} members"
}
In this example, if the count is 1, then the key memberWithCount_one will
be used, and if the count is greater than 1, then the key
memberWithCount_other will be used.
_one and _other are not the only available keys, there are also other keys
available. Please refer to
Plurals documentation on
how to use them.
As per the Neeto standards, we add the WithCount prefix only if we want to
display the count in the string. If all we want is to get the plural or singular
words conditionally, the keys will be:
"member_one": "member",
"member_other": "members"

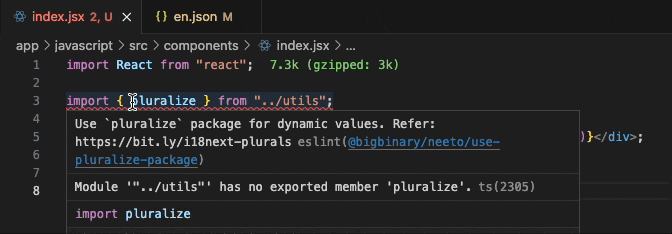
use-pluralize-package
At neeto, it is highly recommended to use i18next's built-in plurals feature for
pluralizing words. However, in certain situations, the use of external packages
like pluralize may be necessary. One
such example is when dealing with user inputs, which can't be anticipated
beforehand and hence won't have a corresponding translation key in our
translation files. In such cases, the pluralize package can be used for
pluralization.
However, we observed that different projects were using different pluralization
packages, and some projects even developed their own custom pluralization
functions. This resulted in a lack of consistency within the codebase. To
address this issue, a unified approach was implemented, mandating the use of a
single pluralization package across all projects. After careful consideration,
the pluralize package was selected as it is the most popular pluralization
package in the JavaScript ecosystem.
So this rule is to enforces the use of the pluralize package.
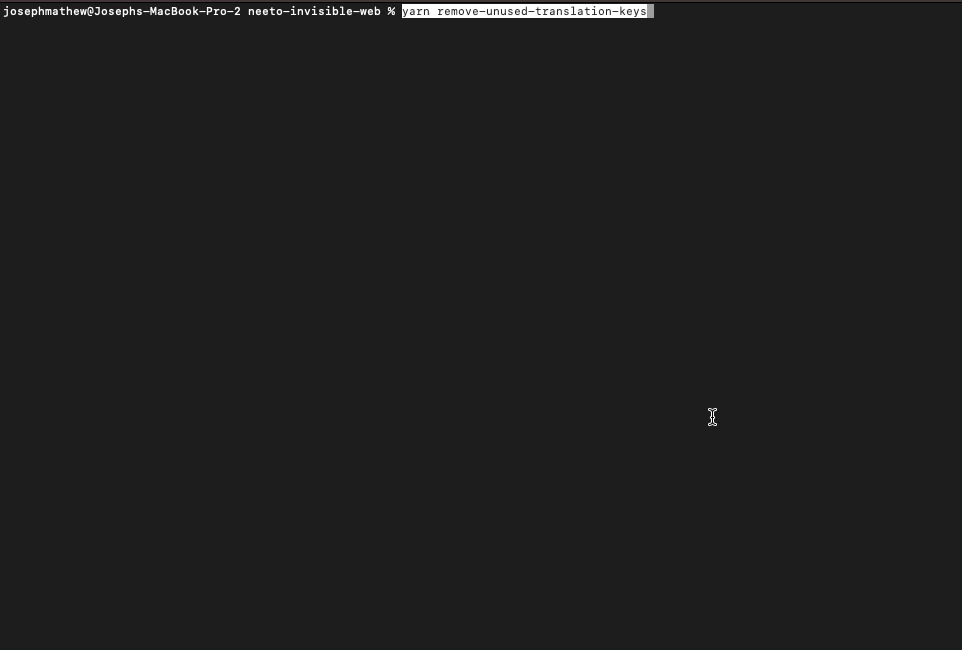
Script prepared to remove unused translations keys
Another problem faced was the accumulation of unused keys in the translation files. This situation often occurred when removing unused code without deleting the corresponding translation keys associated with the removed code. As a result, the translation files became bloated with a significant number of unused keys, making it challenging to maintain them effectively.
To solve this problem, a script was developed to remove unused translation keys
from the translation files. This script is added in
neeto-commons-frontend
package. neeto-commons-frontend is a package encapsulating common code across
Neeto projects.
How does this script work? Let us see it with the help of an example. Consider the following translation file:
{
  "hello": "Hello",
  "button": {
    "save": "Save"
  }
}
This script will check if the translation key hello is used in the codebase or
not and if not, it will remove the translation key hello from the translation
file. Similarly, it will check if the translation key button.save is used in
the codebase or not and if not, it will remove the translation key button.save
from the translation file.
However, an additional challenge surfaced due to the usage of interpolated strings as translation keys in specific scenarios. For instance, consider the following code snippet:
import { useTranslation } from "react-i18next";

const Button = ({ buttonType }) => {
  const { t } = useTranslation();
  const buttonType = "save";

  return <div>{t(`button.${buttonType}`)}</div>;
};
Here, since the translation key is not a simple string, checking if it's used in
the codebase became complicated because of searching for the translation key
button.save in the codebase won't return any results, and hence the script
will remove the translation key button.save from the translation file. But in
this case, the translation key button.save is used in the codebase.
To address this issue, we've made an improvement to the script. It now has a built-in capability to detect translation functions that use interpolated translation keys. These identified translation functions are then included in a section for manual verification at the end of the script. So, once the script has finished running, you should manually analyze the identified translation functions to ensure that the translation keys used in them are present in the translation file. If any of these translation keys have been removed during the initial step, they should be added back to the translation file.
Below is the demo of the script in action:
That's all for now. We hope you found this blog useful. Our goal was to provide valuable insights that can help you with your localization journey. By learning from our experiences and applying these strategies, we believe you will be better equipped to handle the challenges of localization.
Follow @bigbinary on X. Check out our full blog archive.